3.1 Concept of Block Programming
Block programming is a way of writing computer programs by dragging and connecting blocks instead of typing lines of code. Each block represents an instruction, like “move,” “turn,” or “play sound.” You snap blocks together like puzzle pieces to build a program. This method is used to teach programming logic to beginners, especially students, without worrying about typing mistakes or memorizing syntax (the exact spelling and punctuation rules of a coding language). Since you just drag and drop, you can focus on how a program thinks and flows.
Popular block programming tools include Scratch, Blockly, and App Inventor.
3.2 Introduction to Scratch
Scratch is a free block-based programming language developed by MIT (Massachusetts Institute of Technology). It lets you create games, animations, and interactive stories by snapping code blocks together.
Features of Scratch:
- Free and works in a web browser or as a downloadable app
- Drag-and-drop blocks, so no typing errors are possible
- Built-in library of characters (called sprites), backgrounds, and sounds
- Lets you share projects online with other users
- Good for beginners to learn logic, sequencing, and problem-solving
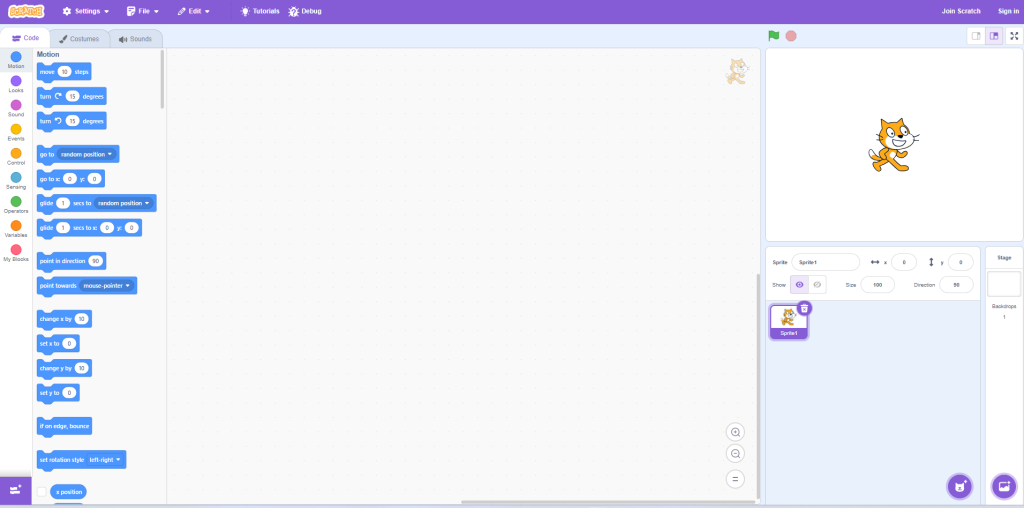
Scratch Interface (main parts of the screen):
- Stage – the area on the top right where your program runs and the sprite moves
- Sprite list – shows all characters/objects used in your project, found below the stage
- Block palette – the middle section showing all available blocks, grouped by category (Motion, Looks, Sound, etc.)
- Script area/coding area – the large blank space on the right where you drag blocks and snap them together to build your program
Blocks are the instructions themselves. Each block does one job, like moving a sprite 10 steps or playing a sound. You connect blocks in order, from top to bottom, and Scratch runs them in that sequence.
3.3 Components (Categories) of Scratch Blocks
Scratch groups its blocks into categories based on what they do:
Control – blocks that manage the flow of your program, such as repeat, forever, if-then, and wait. These decide when and how often other blocks run.
Events – blocks that start a script, such as “when green flag clicked” or “when this sprite clicked.” An event block always sits at the top of a script and triggers everything below it.
Motion – blocks that move a sprite around the stage, such as move, turn, go to x/y position, and glide.
Operator – blocks used for maths and logic, such as addition, comparison (greater than, less than), and joining text together. These are used inside other blocks to make decisions or calculations.
Variables – blocks that let you store and change information while a program runs, such as a score, a name, or a counter. You create a variable, give it a name, and then set or change its value using blocks.
Sounds – blocks that play sound effects or music, change volume, or add sound effects like echo. Used to make projects more lively and interactive.
3.4 Concept of Microbit
The BBC micro: bit is a small, pocket-sized microcontroller board used to teach coding and physical computing.
A microcontroller is a tiny computer built into a single chip. It cannot run a full operating system like a laptop, but it can control simple electronic devices such as lights, sensors, and motors.
Physical computing means writing programs that interact with the real, physical world, not just with images on a screen. For example, you can code a micro: bit to light up when you shake it, or to display a message when a button is pressed.
Sensors on the micro: bit include:
- An accelerometer (detects movement and shaking)
- A compass (detects direction)
- A light sensor
- A temperature sensor
- Two programmable buttons (A and B)
LED Matrix: the micro: bit has a 5×5 grid of small lights (LEDs) on its front. You can program this grid to display letters, numbers, simple pictures, or animations.
The micro: bit can be programmed using block-based tools (similar to Scratch) through the MakeCode website or with text-based languages like Python.
3.5 Concept of Arduino and Arduino UNO
Arduino is an open-source electronics platform made up of both hardware (a circuit board) and software (a coding environment). It’s used to build electronic projects such as robots, sensors, and automated devices.
Arduino UNO is the most common and beginner-friendly Arduino board. It’s described as a “universal microcontroller” because it can be used for a wide range of projects and works with many types of sensors, motors, and displays.
Key points about Arduino UNO:
- It has input pins (to read data from sensors) and output pins (to control devices like LEDs or motors)
- It’s programmed using the Arduino IDE (Integrated Development Environment), usually with a simplified version of the C/C++ language
- Unlike the micro: bit, Arduino UNO does not come with built-in sensors — you connect external components to it using wires on a breadboard
Both micro: bit and Arduino are used to teach students how code can control real objects, not just what appears on a screen.
Practical Tasks
- Write and run a basic program using MIT Scratch to understand how blocks connect and run.
- Create a simple game using different Scratch components — for example, use Motion blocks to move a character, Events to start the game, Operators to keep score, and Variables to track the score.
- Try out free online coding simulators to practice without needing physical hardware.
- Use an online simulator to see how micro:bit or Arduino would behave, without needing to buy the actual board.
Project Work
Students should prepare a simple game or a short story-based project. The project should use Scratch’s control, events, operator, variable, and sound blocks together, and be published on the Scratch website once finished.